How To Install A DuraPlus Chimney
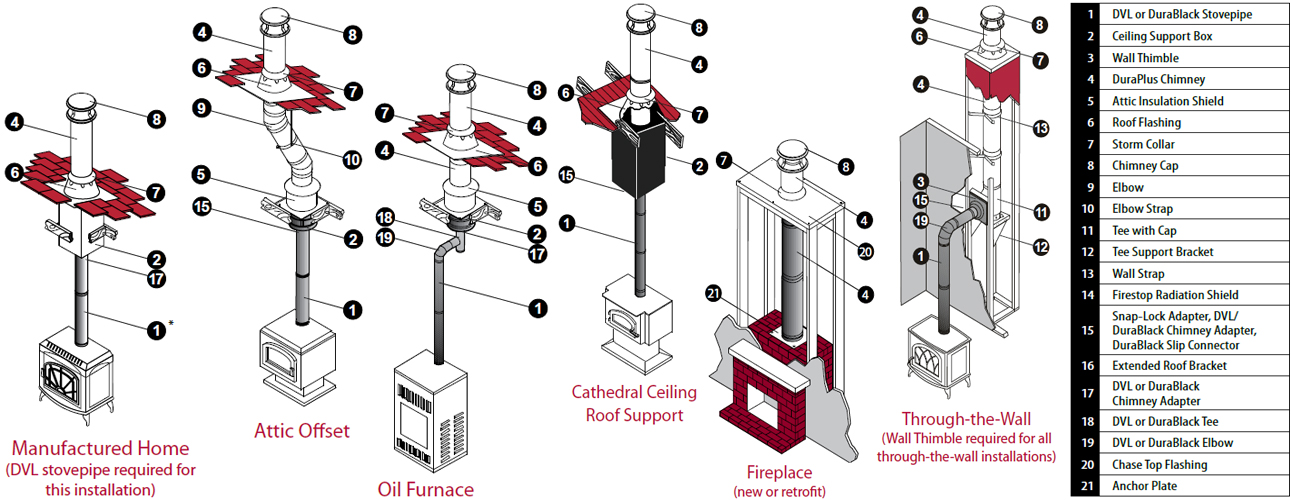
How to Install a DuraPlus Chimney with a Manufactured Home, Attic Offset, Oil Furnace, Cathedral Ceiling Roof Support or Through-The Wall.

2" clearance to combustibles.
Designed for normal, continuous operation at 1000 degrees F flue gas temperatures, DuraPlus (5"-8" diameters) is subjected to rigorous and stringent HT requirements of the UL standard, including on hour at 1400 degrees F, plus three ten-minute chimney fire tests at 2100 degrees F. .016" 430 stainless steel outer wall or .018" galvanized steel outer wall. .018" aluminized steel intermediate liner. .016" 430 stainless steel inner liner, two insulating layers (ceramic blanket plus air space). Available in 6", 7" and 8" diameters. 6", 9", and 12" pipe has 1" insulation blanket; 24", 36" pipe has 1/2" insulation.UL Listed to UL 103HT (MH7399)
Typical Installations
Using the Typical Venting Installation drawings, select the appropriate component parts for your installation.
DVL/DuraBlack Chimney Adapter or DuraBlack Slip Connector must be used when connecting DVL or DuraBlack stovepipe to a Ceiling Support, Wall Thimble, or Finishing Collar.
A Snap-Lock Adapter must be used when attaching snap-lock stovepipe to DuraPlus.
Wall Thimble must be installed with an appropriate section of chimney pipe for all horizontal through-the-wall installations. To accommodate thicker walls a wall thimble extension can be field fabricated.
Attic Insulation Shield must be used in all installations that pass through an attic, regardless of whether the attic is insulated or not. If chimney is enclosed in a chase in the attic space, an Attic Insulation Shield is not required.
Firestop Radiation Shield must be used when a chimney passes through a floor or ceiling without a Ceiling Support Box.
Be fire-safe!
-Maintain at least a minimum 2" clearance (air space) to combustibles. Use proper support and bracing. Follow local building codes and have your chimney inspected by a certified professional.
- Measure the diameter of the appliance flue outlet. Select the chimney and either DVL or DuraBlack connector stovepipe with the same size diameter as the appliance flue outlet. For fireplace installations, refer to the sizing chart in the back of the DuraTech section of this catalog.
- Determine if the installation is a through-the-roof installation or a through-the-wall installation. A through-the-wall installation will require additional components (Wall Thimble, Tee w/ Cap, Tee Support, and Wall Straps).
- Install the chimney in the interior of the structure whenever possible. A cold exterior chimney will produce less draft and will generate more creosote.
- If possible, avoid offsets that serve to restrict the natural draft.

